Importing a Database
 Note: Importing a database requires an internet connection.
Aspect has the ability to import databases from other software vendors, both one at a time and in batch, converting the data into an Aspect customer database and also importing library items into the global database. This conversion is largely done on the Exsero Software web server, which saves a large amount of disk space and system resources on your installation of Aspect. Once you start the import process, the Exsero Software web server will be contacted to do the initial conversion. Then that data is sent back to Aspect which will create the new customer database and optionally import all of the images associated with the inspection.
|
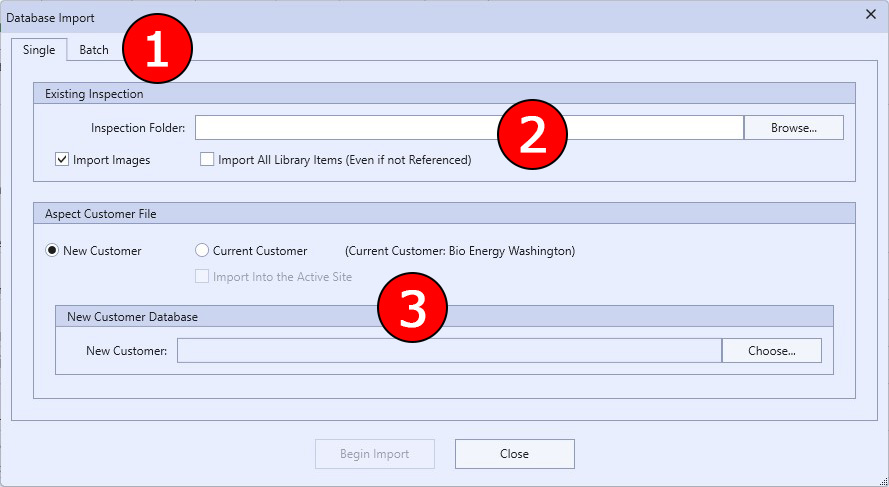
The Import Existing Inspection Data Dialog, Single |
1 These tabs allow you to switch between importing a single inspection and importing them in batch.
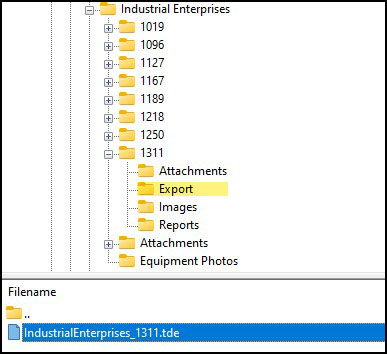
2 This is where you choose the existing inspection folder. The folder chosen should contain inspection folders that are named with numbers only, and a folder named Equipment Photos. In the inspection folders, there must be a subfolder named Export that contains the actual inspection file (either .tde or .tdf). The following picture illustrates this:
|
|
If an inspection folder contains multiple inspection files, the most recent one will be used. |

In the above example, you would choose the Industrial Enterprises folder as the Inspection Folder. Once you start the import process, Aspect will automatically locate the most recent inspection within that folder. If you check Import Images, Aspect will also locate all applicable infrared and daylight equipment images associated with the import file and import those images after the customer database has been created. The checkbox Import All Library Items (Even if not Referenced) can be checked if you want to import all global library items (such as manufacturers, problem components, environments, etc.) whether they are referenced in the importing database or not. If this is the first time importing a database, this might be a good option since it will import your entire library from the inspection data. However, if you already have an established, comprehensive library that has been organized and cleaned up, then checking this box can add unnecessary items to the library. Normally we recommend that this check box be unchecked.
3 In this section, you can choose whether the inspection data is imported into a new Aspect Customer Database, or if one is currently open, into that database.
- New Database: You will be required to choose a new customer database name to import the data into.
- Current Customer: If the currently open customer database has an active site, the option to import the data into the active site will be enabled. This is generally reserved for those cases where, for example, you had previously conducted two separate inspections at the same site (perhaps each every other year) and now want to combine them moving forward. This will combine the locations, equipment, inspections, and problems into the active site. Use this option with caution. If Import Into the Active Site is unchecked, a new site will be created with the imported data.
Importing Inspections in Batch Mode
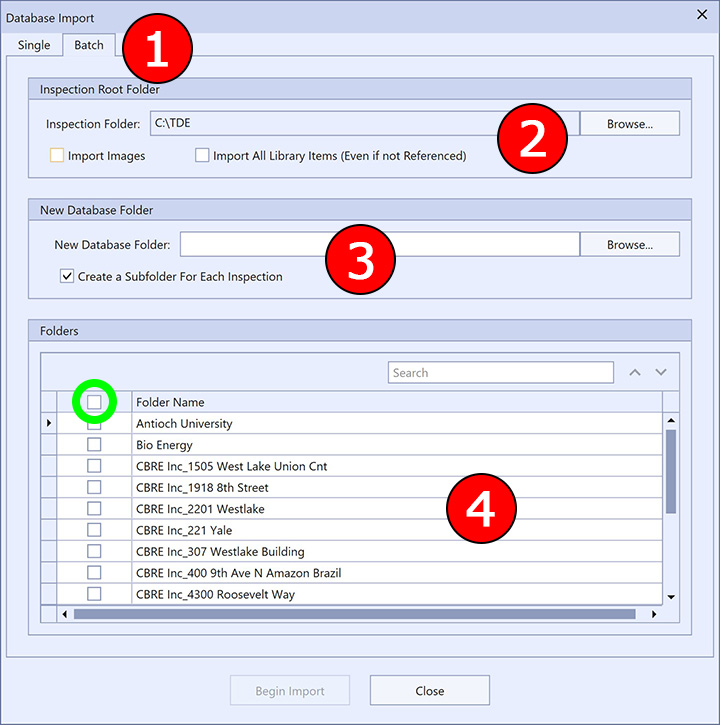
Aspect also allows you to import existing inspections in batch (several at at time). To get to the batch area, click on the Batch tab at the top-left part of the window. In batch mode, you choose the inspections you want to import from a list and a target folder where all of the inspections will be imported to.
|
The Import Existing Inspection Data Dialog, Batch |
1 These tabs allow you to switch between importing a single inspection and importing them in batch.
2 This is where you choose the parent folder for all of your inspections. Each of the folders within this parent folder need to follow the same structure as inspection folders used in single mode.
3 In this section, you choose the parent folder for all of the Aspect customer databases that will be created. If you check Create a Subfolder For Each Inspection, each inspection that is imported will create a folder in the parent folder with the same name as the inspection folder that contains the customer database and assets folder. If unchecked, each customer database will be created directly inside the parent folder along with its assets folder. Note that you cannot import inspections into an existing database like you can in single mode, and in batch mode the assets folder for the customer database will always be in the default location.
4 In this list, you choose the inspections in the parent folder that you want to import by checking the boxes in the first column. In order to toggle between selecting all of the folders or none of them, click the checkbox in the header (shown in the picture by the green circle).
|
|
Once the import operation is complete in single mode, the newly imported database will be opened. In batch mode the operation will simply complete. However, if a customer database was open prior to starting the batch import, it will be closed and reopened to accommodate any changes made to the global database during the import. |