lImporting Images
One of the key features of Aspect is the ability to import all of your daylight and infrared images without the need for any external imaging program. If you want, Aspect will compile a list of all image filenames used by inspections and selectively import just those images into the correct asset folder, while also performing resizing and even importing thermal parameters of images from supported cameras. The Import Images dialog box will remember all of its settings when it is closed, so the next time you import images those settings will be automatically filled in. This is very useful when importing images from the same source and at the same point in your workflow. For example, if you import all of your images into the active inspection every day after being on site, once you set up the parameters on this form once, the next time you import images you should only have to open the dialog and click the Import button.
|
|
Note: once a infrared image has been resized, the embedded thermal parameters (emissivity, transmission, relative humidity, etc) will no longer be accessible. It is very important that you create backups of the original images before importing in case you ever need to access the data on the original image! |

|
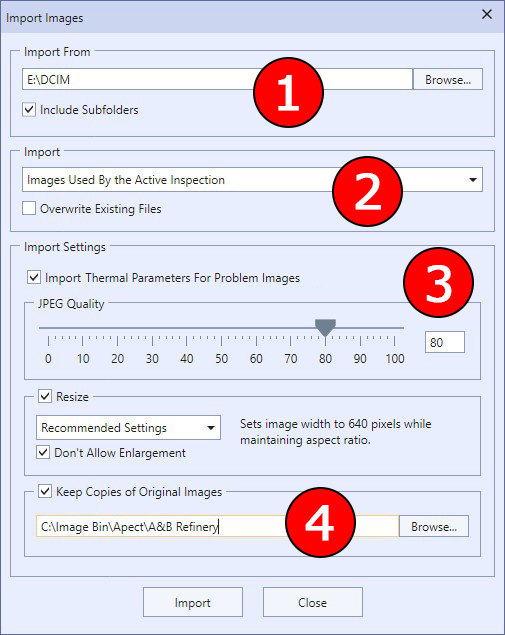
The Import Images Dialog |
1 In this section, you specify the source location for the image files, typically an SD card or other external medium that comes out of a camera. You can just specify the root of the card if you want, and check the Include Subfolders check box. Aspect will then search the entire card for images. Otherwise, if you only want to import from a specific folder (such as the case where you know duplicate file names will be in different subfolders and you want to be sure the images come from the correct one), then leave this box unchecked.
2 In this section, you can specify what image references in the customer database are imported:
|
Aspect will create a list of all image file references used in the active inspection, which include all Component Readings, any images associated with Problems, and Location/Equipment photos. |
|
Aspect will create a list of all image file references used in the active site, including all inspections within that site. |
|
Aspect will create a list of all image file references used in the entire customer database. |
|
Aspect will simply import all of the images on the card into the active inspection's asset folder. No attempt will be made to match image filenames to their associated inspection folder. However, Aspect will make a list of all Problems in the customer database and import the thermal parameters of images referenced in those problems if possible. |
For the first three options, Aspect does a Smart Import of the image files, which means only those images which are referenced in the customer database will be imported. Any images on the source media that don't match up to anything being referenced in the customer database will be ignored. The primary benefits of a Smart Import is that the images will be sorted into their appropriate inspection asset folder instead of just blindly being copied from the source media to one generic folder, and your asset folder won't contain images that aren't being used by that customer database.
3 When importing images, you have the option of resizing the images and/or resampling them with a different image quality to save space (please see the note at the top of this page). Resizing images with a quality rating around 80 can result in significant savings on disk space. When running a report with hundreds of equipment trending images, this can save hundreds of megabytes of space.
For resize settings, you have the following options:
|
The image will be resized to 640 pixels wide, and set the height of the image to whatever is necessary to maintain the aspect ratio of the original image. That is, the image will not be "stretched" in any direction. |
|
The image will be resized to exactly the width and height (in pixels) specified in the text boxes. |
|
Aspect will take the longest edge of the image, either height or width, and resize the image so that edge is the value specified in the text box, and the shorter edge will be set to whatever is necessary to maintain the aspect ratio of the original image. That is, the image will not be "stretched" in any direction. |
|
Aspect will take the shortest edge of the image, either height or width, and resize the image so that edge is the value specified in the text box, and the longer edge will be set to whatever is necessary to maintain the aspect ratio of the original image. That is, the image will not be "stretched" in any direction. |
|
The image will be resized to whatever percentage is specified in the text box. This percentage will be applied to both height and width. So for example, if the image was 500 pixels wide and 400 pixels high, and the percentage was set to 200, the resulting image would be 1000 pixels wide and 800 pixels high. |
If the Don't Allow Enlargement check box is checked, Aspect will only resize the image if the resulting dimensions would be smaller than the original image. Because enlarging an image can degrade quality (depending on the original quality), this option ensures that quality will not be potentially compromised and also ensures that the resulting image size on disk will not be larger than the original.
4 Aspect allows you to make backup copies of the original images before importing (again, see the note at the top of this page). This saves the step of having to do it manually before importing the images into Aspect.