Importing Existing Inspection Data
Aspect features the ability to import data from other software, saving you the time of having to re-enter all of this data from scratch. Currently, TDF and TDE files can be imported and Exsero Software is committed to supporting the importing of data from other software applications in the future.
|
|
Importing an existing inspection requires an internet connection because the Exsero Software web server is required to perform the conversion from the old database to an Aspect customer database. |

|
|
Your inspection data is sent to the Exsero Software web server securely, and is immediately deleted from the server once the conversion has been made. We do not retain any of your data on our web server at any time after the conversion. |

To import an existing inspection:
- Access the backstage view by selecting the File tab from the Ribbon Bar.
- On the left side of the backstage view right under the circle with the arrow in it (which returns you to the main Aspect view), select the Customers section.
- Press Import Existing Data.
- In the Import Database dialog Existing Inspection section, click the Browse button and select the parent folder of the inspection you want to import. This parent folder should contain the inspection subfolder(s) that are named with just numbers, and a subfolder named Equipment Photos. Each inspection folder should contain a subfolder named Export that contains the TDE/TDF file. In order for the import operation to succeed, the folder structure must follow this format. See the illustration below:
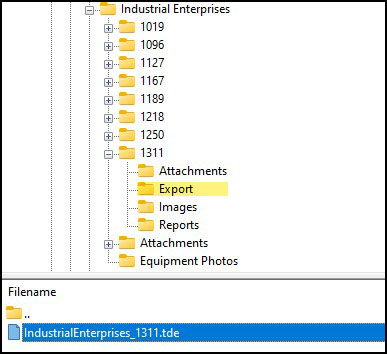
|
|
TDF/TDE files represent a single working inspection, but include all previous inspections and data from those inspections. To import as much of this data as possible, Aspect will always choose the most recent inspection. |
- If you want to import infrared and daylight images for all equipment and imported inspections, check the box Import Images.
- During the import operation, if Import All Library Items is checked, then all library items such as manufacturers will be imported whether they are referenced or not. That is, checking this will import the entire library. This is a good option the first time you import an inspection, but is not recommended once you've "cleaned out" your global libraries. That is, once you've done housekeeping in the Library Editor, by editing the names of library items and/or deleting ones you'll never use, if Import All Library Items is checked then potentially your global library will be populated with a lot of unused items. The safest bet and what we recommend is leaving this box unchecked.
- In the Aspect Customer Section, you can either import the data into a new database or the existing one if a customer database is currently open:
- If you choose New Customer, press the Create button in the New Customer Database section and enter the location and filename of the new customer database.
- If you choose Existing Customer, the ability to create a new database is disabled.
|
|
When importing into an existing customer database, you also have the option of importing into the active site. This is generally reserved for those cases where, for example, you had previously conducted two separate inspections at the same site (perhaps each every other year) and now want to combine them moving forward. This will combine the locations, equipment, inspections, and problems into the active site. Use this option with caution. |
Once all of the data has been entered into the Import Database dialog, press the Begin Import button to start the import process.
|
|
Depending on the size of the inspection being imported and the speed of your internet connection, the web server can take a minute or more to do the conversion. |
|
|
Aspect can also import previous inspection in batch mode which allows you to import multiple inspections at the same time. For more information on using batch mode, see the help topic on the Import Database dialog. |