Setting Sub-Item Statuses
You can set the status of all items within a location, and optionally drill-down into the items in sub-locations within that location using this feature. You can select multiple locations before clicking the "Set Sub-Item Status..." button, and then all of those locations, known as starting locations, will be scanned. This dialog box is not modal, which means after it's open you're free to move around the item tree, collapsing and expanding locations, change item statuses, add or delete items, whatever you want and the dialog will keep up with those changes. Because the dialog shows you a live preview of all the changes, it's easy to follow what's happening and only commit the changes when you're satisfied with what you see. In this topic, when using the term "item", it refers to locations, equipment, and components.
|
|
Because batch-changing status codes is an incredibly powerful function that can potentially set the status of hundreds of items in your inspection with a few button clicks, setting status codes using this feature will not automatically save the changes to the database, even if the autosave setting for changing status codes is enabled (see the topic on Saving the Database for more information). |

|
|
Batch setting status codes bypasses all integrity checks! Although the integrity checks will still work properly during report generation, it is possible to set status codes that violate error-level integrity checks using this tool. |

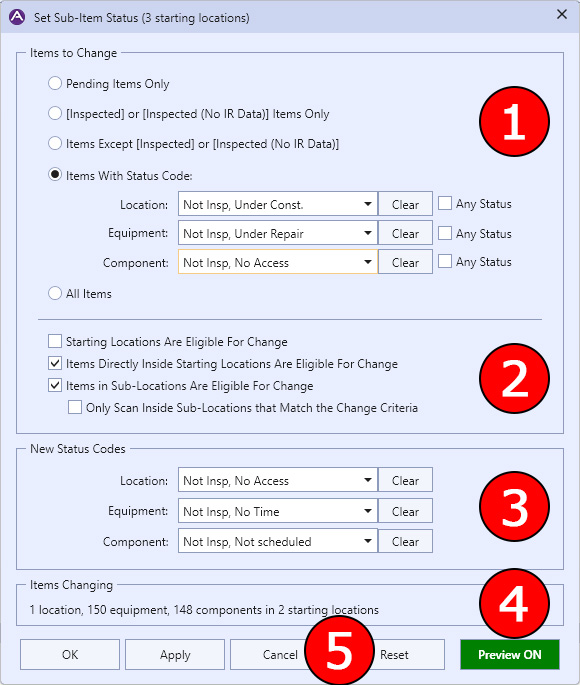
|
The Setting Sub-Item Status window showing the five major sections |
1 In this section, you specify the criteria of the locations, equipment, and components that will be changed by the operation.
|
Only items with a status of Pending will be changed. |
|
Only items with a status of Inspected or Inspected (No IR Data) will be changed. |
|
Only items that do not have a status of Inspected or Inspected (No IR Data) will be changed. |
|
Only items that match the provided status code for each type will be changed. Next to each status type is a Clear button which will set the status code to nothing. In this case, nothing will match. So for example, if you only want to change equipment with a particular status you would clear the location and component status codes so they wouldn't be affected. If the Any Status check boxes are checked, then any status qualifies. So if you checked all three Any Status boxes, that's the same as choosing the All Items option. |
|
All items will be changed regardless of their status. |
|
|
In either the Items With Status Code or New Status Code sections, when you choose a location status, the equipment and component statuses will automatically update to its partner status. In most cases, the codes will be the same. However, a few such as the location code "Under Construction" map to the equipment code of "Not Scheduled". After choosing the location code, you can override the equipment and component codes to whatever you want. Just know that setting the location code will always set the equipment code too. Likewise, setting the equipment code directly will set the component code to the same status. For this reason, it's best to set the status codes from the top down. |
2 In this section, you can specify if the operation will affect starting locations, only affect the immediate items inside the current location, and/or will traverse down the item tree into sub-locations. Before going into depth on how this works, it's helpful to understand some terminology and how it relates to the operation.
First of all, notice the use of the word tree. Think of the locations and equipment window as a tree growing from left to right. The items on the very left are called root items. That is, they don't belong to anything. Items on the very left of the item tree are all root items. Items inside a location are the children of the location (whether they are equipment or other locations). The item to which a child belongs is called the parent. Unlike humans though, a parent location can have multiple children but a child can only have one parent (a piece of equipment can only live in one location obviously). Finally, any item which has no children is called a leaf (referring back to the tree analogy). Therefore, all equipment is automatically a leaf since equipment can't contain anything. Likewise, empty locations are also leafs. Most of the time, locations have children which can be equipment or other locations, and those locations can have children too. Starting at a location and going through all of its children (and their children, and their children, and so on) until you hit all of the leaves and have therefore covered everything under the original parent location is called traversing the tree. Now that you know that, the following section will be easier to follow:
|
If checked, the starting locations themselves will be eligible for change. If unchecked, only items inside of starting locations will be eligible. |
|
If checked, any immediate children of a starting location will be eligible for change. While this will be checked nearly all the time, unchecking this is useful when for example you have a large electrical room with equipment you need to inspect, but several smaller electrical closets off the main room are locked out, under construction, or whatever. Unchecking this allows you to set the status of all of the smaller closets while leaving the items in the main room alone and ready to inspect. Note that the status of sub-locations immediately under a starting location will not be eligible for change when this option is unchecked. So in that example, the equipment in the smaller electrical closets will be set, but not the electrical closet location status codes themselves. |
|
If unchecked, the operation will only affect the immediate children inside the current location. Any immediate children that are locations are eligible to have their statuses set, but the operation will not proceed into the children of any sub-locations. If checked, the operation will traverse the tree (again, all the way down until everything under the starting location is scanned). |
|
If unchecked, Aspect will traverse all sub-locations regardless of their status. The sub-location itself may not have its status changed, but Aspect will check inside those sub-locations (again, all the way down the tree). If checked, Aspect will only scan the children of sub-locations that match the location criteria. So if you have three sub-locations in the main location, two of which are Pending and one Inspected, and your criteria is Pending Items Only, only the two Pending ones will have their children scanned. |
It probably goes without saying, but if you uncheck all of the first three check boxes, nothing will ever be eligible for change--you have to select at least one of them.
3 Set the status code you want to change to here. Just like the Items With Status Code option above, these popups have a Clear button next to them. A status code of nothing means that type of item will not be set. So in the image above, if you opened the New Location Status popup and chose clear, no locations would be set in the operation.
Also, the batch operation will obey the rule that any component of equipment whose status is Pending means that the equipment's status must also be Pending. It is possible that a piece of equipment whose status is not Pending doesn't meet the criteria for change, but if one of its components gets set to Pending, the status of the equipment will automatically switch to Pending as well.
4 This box will tell you how many locations, equipment, and components will be affected by the operation.
5 The following buttons are available:
|
Commits the operation and closes the dialog box. |
|
Commits the operation but keeps the dialog box open--very handy if you have several complex layered operations to perform in one location. |
|
Closes the dialog box without making any changes. |
|
Resets any changes made to the options in the dialog box to their default values. |
|
This button allows you to see a live preview of the operation before committing it. If preview is on, the status of the item will also change to what the new status would be. Whether preview is on or off, all items that will be changed during the operation will have their status highlighted in yellow. You can toggle this button to see the "before and after" view of the operation before committing it using either OK or Apply. Note that it's possible to have an equipment status not changing, but the equipment status will be highlighted in yellow if any of its components are changing. In this case, the status text itself won't change, just the highlight. |
When you click either OK or Apply, the options in the dialog box will be preserved for that session of Aspect. When you choose Set Sub-Item Status again, the last used options will automatically populate in the dialog box. If you want to start over with the default values, simply click the Reset button. Also, if you hold down either CTRL key while clicking the Set Sub-Item Status button, the dialog will open with all options reset.