Equipment Detail
The equipment detail section is where you'll spend a majority of your time during an inspection. Equipment detail contains data for three parts of a piece of equipment:
- The equipment itself
- The components of the equipment
- Inspection data for the equipment and components
In addition, the detail area also has a trending section where you can see the component data of past inspections and a chart that shows the temperature data for the current component over time.
The data fields in this section (basically everything from the name down to the inspection frequency) are fields that do not change between inspections. Therefore these fields usually only have to be entered once. Here are a few notes on this section:
- You can have photographs of the current equipment and the current component. The equipment photograph does not appear in any report, but simply exists to help the technician conducting the inspection identify the equipment at the inspection site. This image uses the same on-deck auto-sequencing field that location photos use. The current component's photograph is the most recent daylight image taken during a component reading, typically at the same time as an infrared image. The current component's photograph is used in several reports.
- The barcode can be an auto-sequenced field. The first time you conduct an inspection on a site, you may be barcoding everything. Using the barcode auto-sequenced field in conjunction with Setting Default Values will save a lot of time not having to enter the barcode manually.
- The manufacturer can be a default value specified by its parent location. For more information, see the topic on Location Detail.
- The inspection frequency of a new piece of equipment will default to its parent site's inspection frequency. For more information, see the topic on Site Detail.
Equipment is made up of components, and this section defines those components. The selected component in the list determines the data in the Component Data box. Components have the following fields:
- The component list. All equipment must have at least one component. You can otherwise add, edit the name of, and delete components.
|
|
The order in which components appear in the list can be rearranged by dragging and dropping components. |

- Whether the component is included in equipment trending reports or not. To be included in an equipment trending report, this value must be checked and the inspection status of the component must be Inspected.
|
|
The trending status of all equipment in a location (and optionally all equipment in that location's sub-locations) can be set with the Trend This Location... button in the Location Detail. |
- The component's barcode, which is optional if you want to use them. For example, a really big MCC could be a piece of equipment made up of many buckets that are the components of the equipment. If you want to barcode each bucket, check the barcode box and either fill in a barcode or let the auto-sequenced fields do it automatically. When setting default values for equipment with component barcodes, the equipment gets assigned a barcode first, then the currently selected component.
- The component's manufacturer. This is handy in case the manufacturer of a component is not the same as the equipment it is a part of.
- The component's type. By choosing a component type from the list, you have the benefit of Aspect knowing temperature data about that component that can be automatically filled in some instances:
- When setting default values, the temperature threshold of the component will be automatically filled.
- The temperature rated rise is required when documenting a problem that uses absolute temperature criteria for calculating problem severity. See the topic on Severity Calculation Method for more information.
The component manufacturer and component type also have two buttons to the right of them--a green check and red X. These buttons set and unset the default manufacturer and component for this piece of equipment. In the example above for the MCC, when creating dozens of buckets these default values keep you from having to set those fields for every new component. To set a default manufacturer or component type:
- Choose a manufacturer or component type from the list.
- Press the green check button.
Now all newly created components will automatically be assigned those default values.
This is where inspection data, most notably temperature data, is entered for each component. The component data section has the following fields:
- Use Daylight Image for Current Component checkbox. If this is checked, the daylight image that you take for this component for the active inspection will be used in the Component Image box in the upper-right part of the equipment detail screen. If unchecked, it will not be used and instead Aspect will use the next oldest daylight image from previous inspections. A good example of when you might uncheck this is if the current inspection's daylight image is particularly dark or blurry. You may decide to use it in this inspection's reports, but not use it in the Component Image box because last year's image is much better.
- Use Daylight Image in Reports checkbox. If this is checked, the daylight image that you take for this component will be used in any reports that require the daylight image for this component. If unchecked, the daylight image of the most recent component reading where Use Daylight Image in Reports is checked will be used instead. A good example of when you might uncheck this box is if the current inspection's daylight image is basically unusable. You would keep it for documentation, but use a previous inspection's daylight image for this inspection's reports.
- The temperature data fields. These are self-explanatory to all thermographers. Note that all temperature fields in Aspect will specify which system (Celsius or Fahrenheit) they are currently using.
- The image fields. These fields can be auto-sequenced. These fields can contain relative or absolute paths along with the filename (although they typically don't have any path). If a relative path is used, it is relative to the inspection's asset folder. For example, look at this simple directory structure:
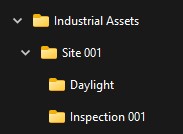
If the inspection with number 001 is your active inspection, then all image files without any path will be stored in that folder. But if you had a file in one of the image text fields with the name "..\Daylight\DCIM9923.jpg", Aspect will look for that file in the Daylight folder (the two dots at the beginning of the path tell Aspect to move one folder up the hierarchy, in this case up to Site 001 and then into the Daylight folder).
- The images. If the filename in the image text fields resolves to an image, then that image will be displayed here. Generally, these images don't show anything until you import images.
- The set default buttons. These buttons set auto-sequenced and default values for the equipment, components, and with the Fill IR Data and Equipment/Component Defaults button will also fill in default component data such as auto-sequenced image numbers and temperature data when possible.
- The component inspection status. Once you are done inspecting a component, set the status of the component here.
|
|
You are unable to change the inspection status of the equipment while any of its components have a status of Pending. |

|
|
Time-saving tip: You can right-click on an item in the component inspection status drop-down list instead of left-clicking. When you right-click, if no other components have an inspection status of Pending, then Aspect will set the equipment's inspection status to the same value you are setting for the component. There are also shortcut keys you can use to set the inspection status. |
|
|
If Restrictive Editing is enabled, any fields related to inspection data (such as temperatures, the image filenames, inspection notes, etc.) can only be edited when the inspection status is Pending. |
- The Show Previous Images icons. These two icons live between the temperature data fields and infrared image for the current component reading. When hovered over like any other image in Aspect, these two icons will show you the most recent previous inspection's infrared and daylight pictures of this component. This allows you to check the daylight image to see what you opened up on a piece of equipment the last time you were on an inspection, and you can check the infrared photograph to see where you put your temperature targets for consistent trending. If the icons aren't visible, it means no previous component reading data exists, usually because no previous inspection exists or pictures were not taken on the previous inspection.
- Component reading notes. Use this text field for noting anything about the selected component data specific to this inspection. For example, maybe with each inspection you take an amp reading of a particular component every time. This note field would be an ideal place to track this. These notes show up in the Equipment Trending report (list or both, but not chart) in the list at the bottom of the report.
- Internal notes. The internal notes do not show up in any report. They are purely there for your own internal use.
The Problem Documentation Section
In this section you create and delete problems associated with this equipment. All problems associated with this equipment appear in this list, but when creating a new problem, it is important to note that problems are associated with components. Therefore, in Problem Detail, the images for the problem and temperature data will come from the associated equipment component. See the topic on Documenting a Problem for more information.
This section of equipment detail shows data for all other inspections on the currently selected component. This section has two tabs:
- Other Inspection Equipment Readings. This shows a list of all temperature data and images of the currently selected component from inspections except for the active inspection. This list allows you to look through other inspections on the fly to examine temperature trends over other inspections, and look at the images from prior inspections as well. You can also enable or disable using a previous inspection's daylight image for the component image in this list, same as the Use Daylight Image for Current Component checkbox in the Component Data section.
- Historical Trending Chart. This chart shows you a graphical representation of the temperature data for the currently selected component over all completed inspections. If you move the mouse over the chart, you can get detailed information about specific points on the chart.
This section contains notes that you may want to make about the currently selected equipment. There are two notes fields:
- Equipment Notes do not change from inspection to inspection, so this field is good for noting things such as a combination to open the door of a piece of equipment, or a procedure for opening a lock while the equipment is energized.
|
|
Equipment notes do not appear in any reports. They are purely there for your own internal use. |
- Inspection Notes change with each inspection, so this field is good for noting things about that equipment relative to this inspection. For example, you might note that the access door to the equipment was found open while the equipment was energized, and you closed it when completing your inspection.
|
|
Inspection notes appear in the Equipment Inventory report. |