Creating Locations and Equipment
Once you have activated a site, you can begin entering locations and equipment into that site. Generally speaking, locations are areas within a site that contain equipment. However, locations can also have barcodes and you can document visual problems for a location (for example, the roof in this room is leaking water onto the electrical panels).
To create locations and equipment:
- Click on the Locations & Equipment tab on the left side of the main Aspect window, directly under the ribbon bar.
- In the tree view on the left side of the window, you can either right-click to get a popup menu or use the buttons in the Locations & Equipment section of the ribbon bar. Then you can perform the following actions:
- New Root Location: This creates a new location at the root of the tree--that is, at the topmost level. A root location has no parent location. A good example of a root location would be an entire floor of a building you're inspecting.
- New Location: This creates a new location whose parent location is the currently selected location (therefore, if the currently selected item is equipment, this option is disabled).
- New Equipment: This creates a new piece of equipment whose parent location is the currently selected location. If nothing in the tree is selected, the equipment will be added at the root level. If a piece of equipment is currently selected, the new equipment's parent location will be the same as the selected equipment.
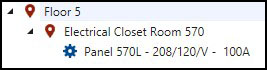
In the following image, you start by choosing New Root Location and naming it Floor 5. Floor 5 is now a root location. Selecting Floor 5 and choosing New Location would add Electrical Closet Room 530. Then selecting the electrical closet and choosing New Equipment would add the panel.